function keyED($txt,$encrypt_key){
    $encrypt_key =    md5($encrypt_key);
    $ctr=0;
    $tmp = "";
    for($i=0;$i<strlen($txt);$i++)
    {
        if ($ctr==strlen($encrypt_key))
        $ctr=0;
        $tmp.= substr($txt,$i,1) ^ substr($encrypt_key,$ctr,1);
        $ctr++;
    }
    return $tmp;
}
function encrypt($txt,$key)   {
    $encrypt_key = md5(mt_rand(0,100));
    $ctr=0;
    $tmp = "";
     for ($i=0;$i<strlen($txt);$i++)
     {
        if ($ctr==strlen($encrypt_key))
            $ctr=0;
        $tmp.=substr($encrypt_key,$ctr,1) . (substr($txt,$i,1) ^ substr($encrypt_key,$ctr,1));
        $ctr++;
     }
     return keyED($tmp,$key);
}

function decrypt($txt,$key){
    $txt = keyED($txt,$key);
    $tmp = "";
    for($i=0;$i<strlen($txt);$i++)
    {
        $md5 = substr($txt,$i,1);
        $i++;
        $tmp.= (substr($txt,$i,1) ^ $md5);
    }
    return $tmp;
}
function encrypt_url($url,$key){
    return rawurlencode(base64_encode(encrypt($url,$key)));
}
function decrypt_url($url,$key){
    return decrypt(base64_decode(rawurldecode($url)),$key);
}
function geturl($str,$key){
    $str = decrypt_url($str,$key);
    $url_array = explode('&',$str);
    if (is_array($url_array))
    {
        foreach ($url_array as $var)
        {
            $var_array = explode("=",$var);
            $vars[$var_array[0]]=$var_array[1];
        }
    }
    return $vars;
}

$key_url_md_5 = 'mdaima.com-123-scc'; //可以更换为其它的加密标记,可以自由发挥PHP将URL地址参数进行加密传输提高网站安全性
WorkerMan推送数据到前端
1.服务器开放端口号
2.宝塔开放端口号
3.workerman文件夹放到相应目录下
4.php start.php start
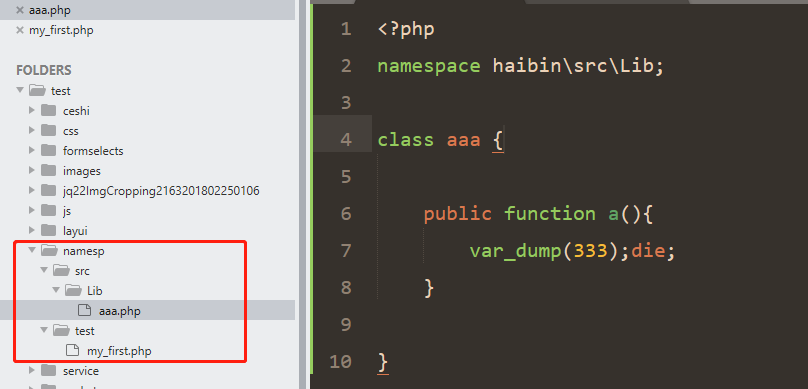
命名空间
为避免相同分类名,相同方法名冲突,引入命名空间概念
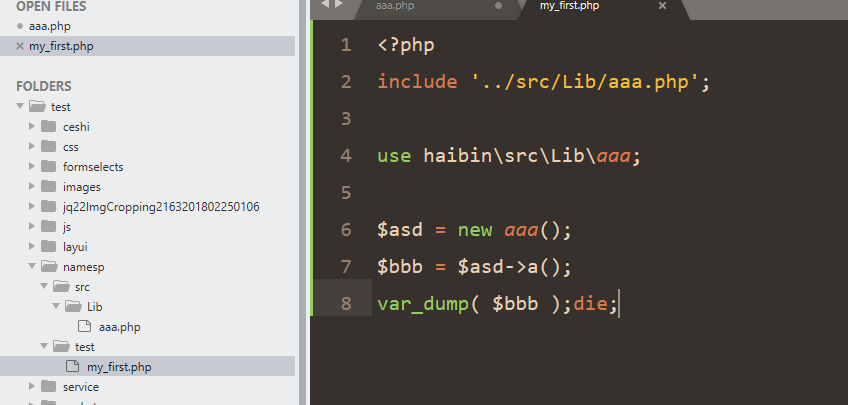
若是在框架中,则引用auto_load文件就可引入,此处没有用框架,则需要引入,include 为物理引入,use为逻辑引入,只有先物理引入才能用use。
现在我们来看使用:
1.include引入类文件
2.use引入
3.new类
4.调用类中方法
注意
类的namespace可自己随意写,此处写了haibin\src\Lib所以文件实例化时就写成
use haibin\src\Lib\aaa; new aaa();
如果写haibin\Lib,则需写成 use haibin\Lib\aaa; new aaa();
总之一句话,就是类文件命名空间是什么,文件实例化时就写什么+类名,必须写明use哪个类名,不然不知道要用哪个类
二维数组根据某一列排序
//根据字段bad_num对数组$bad进行降序排列
        $last_names = array_column( $bad, 'bad_num' );
        array_multisort( $last_names, SORT_DESC, $bad );
a标签点击图片链接下载到本地
$url='http://apply.com/static/upload/head/20190711/d612d32ac92be41a64ffb091fad01508.png';
$file_name = time().'.png';    //保存的图片名称
header('Content-Description: File Transfer');
header('Content-Type: application/octet-stream');
header('Content-Disposition: attachment; filename='.$file_name);
header('Content-Transfer-Encoding: binary');
header('Expires: 0');
header('Cache-Control: must-revalidate, post-check=0, pre-check=0');
header('Pragma: public');
header('Content-Length: ' . filesize($url));
ob_clean();
flush();
readfile($url);
exit;
crontab调用svn更新版本库
*/1 * * * * /usr/bin/svn update /home/wwwroot/test.huazhenginfo.com

# U:表示从服务器收到文件更新了 G:表示本地文件以及服务器文件都已更新,而且成功的合并了  其他的如下: A:表示有文件或者目录添加到工作目录 R:表示文件或者目录被替换了. C:表示文件的本地修改和服务器修改发生冲突       本文转自建波李 51CTO博客,原文链接:http://blog.
TP5隐藏index.php
一,找到/public/.htaccess文件,如果你的入口文件已经移动到根目录下,那么你的.htaccess文件也要剪切到根目录下,总之要确保.htaccess跟入口的index.php保持同级。
1.Apache:
<IfModule mod_rewrite.c>
  Options +FollowSymlinks -Multiviews
  RewriteEngine On

  RewriteCond %{REQUEST_FILENAME} !-d
  RewriteCond %{REQUEST_FILENAME} !-f
  RewriteRule ^(.*)$ index.php?/$1 [QSA,PT,L]
</IfModule>
2.Nginx(在Nginx.conf中添加):
location / { // …..省略部分代码
    if (!-e $request_filename) {
        rewrite  ^(.*)$  /index.php?s=/$1  last;
        break;
    }
}
3.phpstudy:
<IfModule mod_rewrite.c>
Options +FollowSymlinks -Multiviews
RewriteEngine on
RewriteCond %{REQUEST_FILENAME} !-d
RewriteCond %{REQUEST_FILENAME} !-f
RewriteRule ^(.*)$ index.php [L,E=PATH_INFO:$1]
</IfModule>
Tp5开发规范
命名规范
ThinkPHP5遵循PSR-2命名规范和PSR-4自动加载规范,并且注意如下规范:
目录和文件
目录使用小写+下划线;
类库、函数文件统一以.php为后缀;
类的文件名均以命名空间定义,并且命名空间的路径和类库文件所在路径一致;
类文件采用驼峰法命名(首字母大写),其它文件采用小写+下划线命名;
类名和类文件名保持一致,统一采用驼峰法命名(首字母大写);
函数和类、属性命名
类的命名采用驼峰法(首字母大写),例如 User、UserType,默认不需要添加后缀,例如UserController应该直接命名为User;
函数的命名使用小写字母和下划线(小写字母开头)的方式,例如 get_client_ip;
方法的命名使用驼峰法(首字母小写),例如 getUserName;
属性的命名使用驼峰法(首字母小写),例如 tableName、instance;
以双下划线“__”打头的函数或方法作为魔术方法,例如 __call 和 __autoload;
常量和配置
常量以大写字母和下划线命名,例如 APP_PATH和 THINK_PATH;
配置参数以小写字母和下划线命名,例如 url_route_on 和url_convert;
数据表和字段
数据表和字段采用小写加下划线方式命名,并注意字段名不要以下划线开头,例如 think_user 表和 user_name字段,不建议使用驼峰和中文作为数据表字段命名。
应用类库命名空间规范
应用类库的根命名空间统一为app(不建议更改,可以设置app_namespace配置参数更改,V5.0.8版本开始使用APP_NAMESPACE常量定义);
例如:appindexcontrollerIndex和appindexmodelUser。
微信支付
1.获取prepay_id
2.根据prepay_id获取支付参数
后台
$wx_pay_config                   = [];
       $wx_pay_config['appid']          = config('appid');
       $wx_pay_config['appsecret']      = config('appsecret');
       $wx_pay_config['token']          = config('token');
       $wx_pay_config['encodingaeskey'] = config('encodingaeskey');
       $wx_pay_config['mch_id']         = config('mch_id');
       $wx_pay_config['partnerkey']     = config('partnerkey');
       $wx_pay_config['cert_key']       = config('cert_key');
       $wx_pay_config['cert_cert']      = config('cert_cert');

       $wechatpay    = new WechatPay( $wx_pay_config );
       $openid       = $order_info['openid'];
       $body         = $order_info['product_name'];
       $out_trade_no = $order_info['order_sn'];
       $total_fee    = $order_info['total_price'] * 100;
       $notify_url   = config('url_domain_root') .'mobile/Notify/index';
       $prepayid     = $wechatpay->getPrepayId( $openid, $body, $out_trade_no, $total_fee, $notify_url );
       $wx_res       = $wechatpay -> createMchPay( $prepayid );

      $jsticket    = new WechatScript( $this->option );
      $protocol    = (!empty($_SERVER['HTTPS']) && $_SERVER['HTTPS'] !== 'off' || $_SERVER['SERVER_PORT'] == 443) ? "https://" : "http://";
      $url         = $protocol.$_SERVER['HTTP_HOST'].$_SERVER['REQUEST_URI'];
      $jssign_info = $jsticket -> getJsSign( $url );
      //return view( 'index', [ 'data'=> json_encode( $wx_res ) ] );
      return view( 'index', [ 'title' => '支付订单', 'data'=> $wx_res, 'obj'=> $jssign_info, 'order_info'=>$order_info] );
前台
<script src="http://res.wx.qq.com/open/js/jweixin-1.1.0.js"></script>
        <script>
          wx.config({
            debug: false,
            appId: '{$obj["appId"]}',
            timestamp: '{$obj["timestamp"]}',
            nonceStr: '{$obj["nonceStr"]}',
            signature: '{$obj["signature"]}',
            jsApiList: [
              // 所有要调用的 API 都要加到这个列表中
                'chooseWXPay',
              ]
          });
        </script>
        <script type="text/javascript">
            function getOrder(){
                wx.chooseWXPay({
                    timestamp: '{$data["timestamp"]}', // 支付签名时间戳,注意微信jssdk中的所有使用timestamp字段均为小写。但最新版的支付后台生成签名使用的timeStamp字段名需大写其中的S字符
                    nonceStr: '{$data["nonceStr"]}', // 支付签名随机串,不长于 32 位
                    package: '{$data["package"]}', // 统一支付接口返回的prepay_id参数值,提交格式如:prepay_id =***)
                    signType: '{$data["signType"]}', // 签名方式,默认为'SHA1',使用新版支付需传入'MD5'
                    paySign: '{$data["paySign"]}', // 支付签名
                    success: function (res) {
                        // 支付成功后的回调函数
                        alert('支付成功!');
                        window.location.href = "{:url('Mycenter/index')}";
                    },
                    fail: function (res) {
                        alert(JSON.stringify(res));
                    }
                });
            }
        </script>
注意事项:
1.商户后台填写授权支付域名,如果带参数,最好带一个,其余参数可以根据这个去获取,如:http://xxxxxx/mobile/wxpay/index/order_id/33.html
这时候授权支付域名就是 http://xxxxxx/mobile/wxpay/index/order_id/
2.支付成功异步回调,一定不能继承逻辑代码的父类,最好单独一个类
微信获取config参数及共享地址
后台
$jsticket     = new WechatScript( $this->option );
        $protocol     = (!empty($_SERVER['HTTPS']) && $_SERVER['HTTPS'] !== 'off' || $_SERVER['SERVER_PORT'] == 443) ? "https://" : "http://";
        $url          = $protocol.$_SERVER['HTTP_HOST'].$_SERVER['REQUEST_URI'];
        $jssign_info  = $jsticket -> getJsSign( $url );
前台
<script src="http://res.wx.qq.com/open/js/jweixin-1.1.0.js"></script>
     <script>
      wx.config({
        debug: false,
        appId: '{$obj["appId"]}',
        timestamp: '{$obj["timestamp"]}',
        nonceStr: '{$obj["nonceStr"]}',
        signature: '{$obj["signature"]}',
        jsApiList: [
          // 所有要调用的 API 都要加到这个列表中
            'checkJsApi',
            'openAddress',
            'editAddress'
          ]
      });
    </script>
    <script language="javascript">
        function callpay()
        {
            wx.openAddress({
                trigger: function (res) {
                   // alert('用户开始拉出地址');
                },
                success: function (res) {
                   var address_info = res.detailInfo + ' ' + res.userName + ' ' + res.telNumber;
                   $('#address').html( address_info );
                   $('#link_people').val( res.userName );
                   $('#link_phone').val( res.telNumber );
                },
                cancel: function (res) {
                   alert('地址拉取取消');
                },
                fail: function (res) {
                   alert('地址拉取失败');
                }
            });
        }
    </script>

